
Here’s a step-by-step guide to running feedback assessments for an individual. Alongside the instructions, you’ll find best practice callouts to ensure you deliver the best possible feedback to your clients.
Preparing for the Assessment
1. Determine Feedback Assessment Type
Work with your client to determine whose feedback they’ll seek. Will it come only from subordinates through an Upward Feedback Assessment, or will it be a complete 360-degree assessment, including anyone they’ve worked with? Candorly protects anonymity and values all feedback, so we don’t disclose which audience provided specific input.
2. Collect Feedback Providers
Ask your client to provide a list of Feedback Providers, including first name, last name, and email address. We recommend inviting 8–12 people to ensure sufficient responses. To protect anonymity, a Candorly Feedback Report requires a minimum of five completed feedback forms. While this threshold can be lowered to three during assessment setup, fewer responses may result in a less comprehensive report.
3. Notify Feedback Providers
To ensure Feedback Providers know of the request and expect an email from Candorly, we require clients to notify them in advance. Here is template language to use.
4. Create the Employee Import Template
To bulk import participant names, complete the provided Excel template. You can skip this step if you plan on manually entering participants one by one. You’ll see where to do that in step 9 below. On the first tab of your template spreadsheet, 1. All Participants & Raters, enter the names and email addresses of the Feedback Recipient and all Feedback Providers, ensuring each column matches the header row.
On the second tab, Feedback Pairings, enter the Feedback Recipient’s email address in Column A for as many rows as there are Feedback Providers. Then, list each Feedback Provider’s email address in Column B.
A successfully completed form should be error-free.
Setting up the Assessment
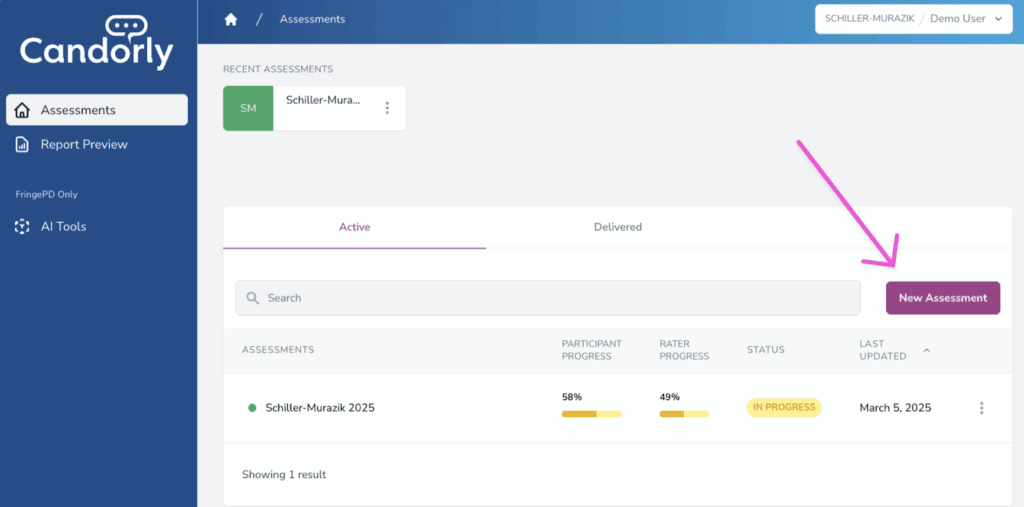
5. Log into Candorly and create your Assessment
Hit the purple “New Assessment” button to create a new feedback assessment.
Here on the General tab, you’ll customize your Assessment Settings.

You’ll adjust the following items and save your Assessment:
- Pick your team in the Team dropdown
- The assessment name is usually the year and the client’s name
- The launch date, when you want to start the assessment and feedback collection, is open.
- The closing date is usually 2-3 weeks after the launch date
- Support email is where you should add the preferred email address if there are any participants with questions. We see very little technical support, so most questions are about the process.
- In Assessment Format, “One” must be checked to run an individual assessment. This is ensures no group comparisons are turned in the analysis and final report.
- Report Eligibility are the criteria that Participants must meet to receive a feedback report.
- Self-Assessments are required in an individual assessment and are strongly recommended in group assessments.
- Feedback Questionnaire Threshold is the number of feedback forms a participant must receive to be eligible for a report. We recommend leaving this at 5 completed feedback forms, but it can be lowered to 4 or 3.
- The Coaching link is where an admin can add your calendar booking link to the User Dashboard. This allows Participants to book a follow-up session with you easily.
- Request Additional Feedback allows a Feedback Recipient to add additional Feedback Providers in the middle of the process. If this user’s email hasn’t been added to the platform via the Employee Import spreadsheet, Participants can add them at this stage, and the new rater will receive an email notifying them to participate.
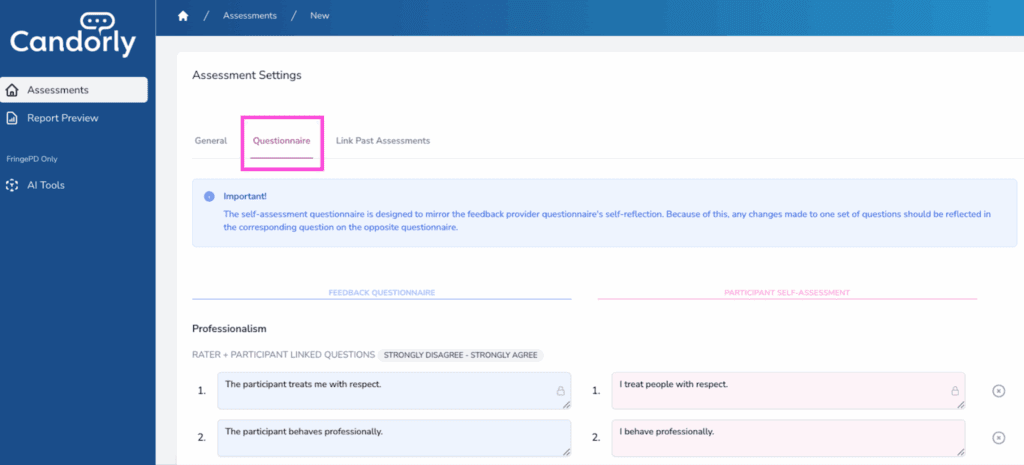
6. Edit the Questionnaire
While our template has been pressure tested with thousands of feedback forms, we know you want to customize the language to fit company culture and vernacular. You can edit questions for the Self-Assessment and Feedback Questionnaire on the Questionnaire tab. Since the Self-Assessment is designed to align with the Feedback Questionnaire, any changes made to one should be reflected in the corresponding question on the other.
There are a few questions that have a lock icon on the right-hand side of the text box. Those questions are our Touchstone questions and can not be edited. Among them are the Growth Mindset questions that are only asked in the Self-Assessment, and the Collegiality question that is asked only in the Feedback Questionnaire.
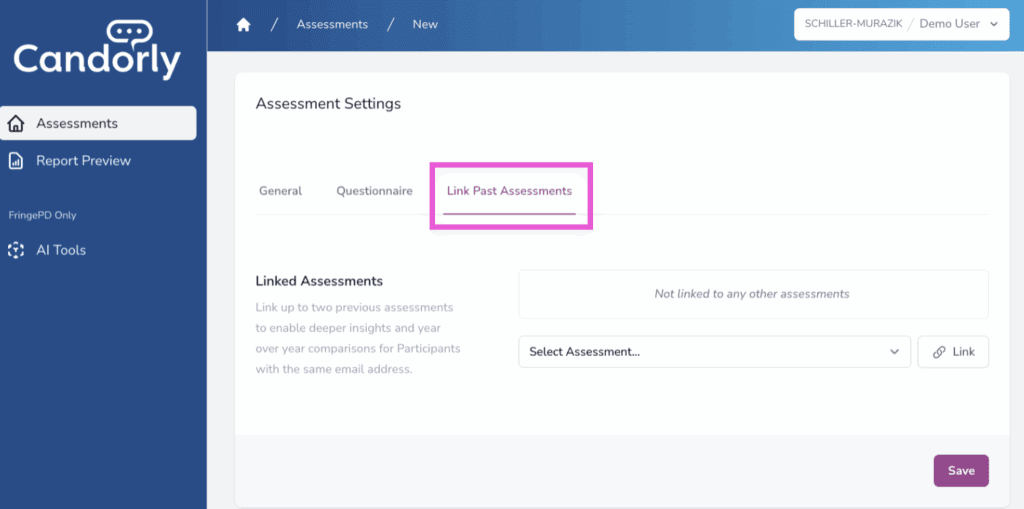
7. Link Past Assessments
If your client has done a Candorly Assessment in the past, you can link those results to this Assessment. The report will show year-over-year changes between assessments.
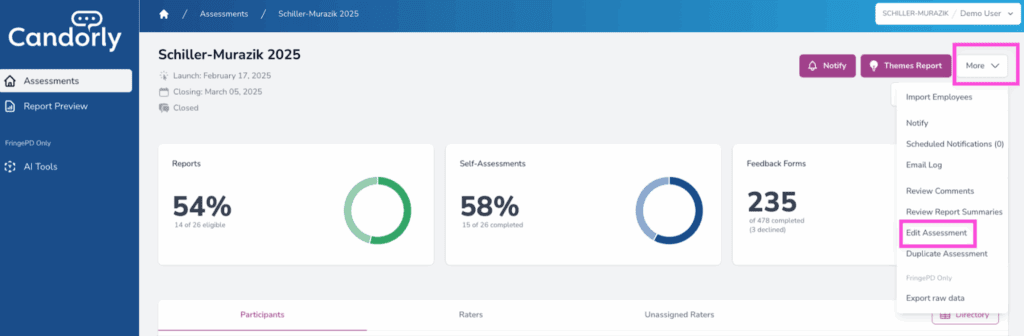
8. At any stage in the Assessment, you can edit any of these variables by clicking on the “more” drop-down menu and then “Edit Assessment.” However, once you start collecting feedback, you can not change the questionnaire.
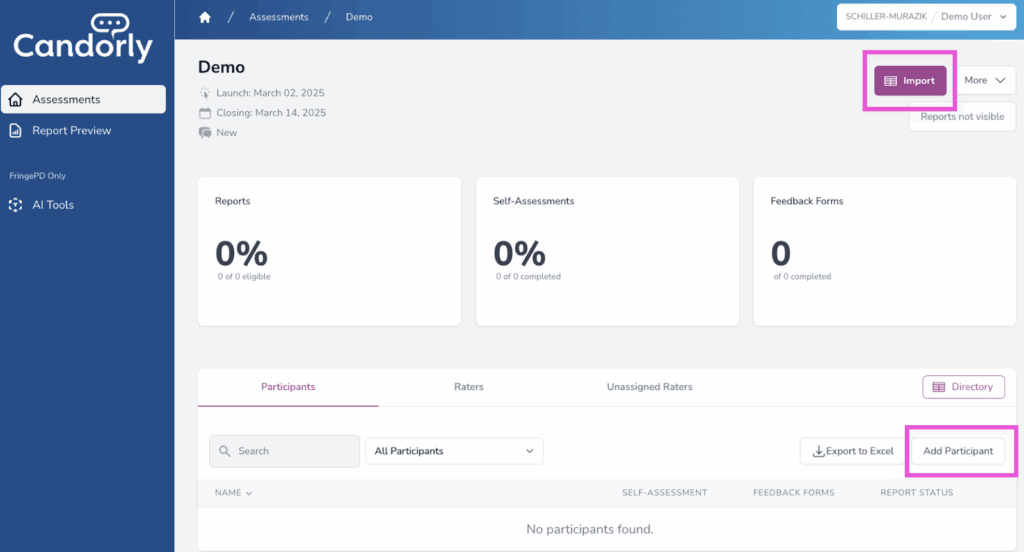
9. Import your Participants
On the Assessment Dashboard, click the purple “Import” button to bulk import Feedback Recipients and Feedback Providers. Upload the Spreadsheet you created in step 4. Once imported, check the list of Participants and Raters and double-check that the numbers are correct. If you want to add someone manually, click “Add Participant” in the participant table halfway down the page. There, you’ll be able to enter their name and email.
You’re now ready to run this Feedback Assessment!
Conducting the Assessment
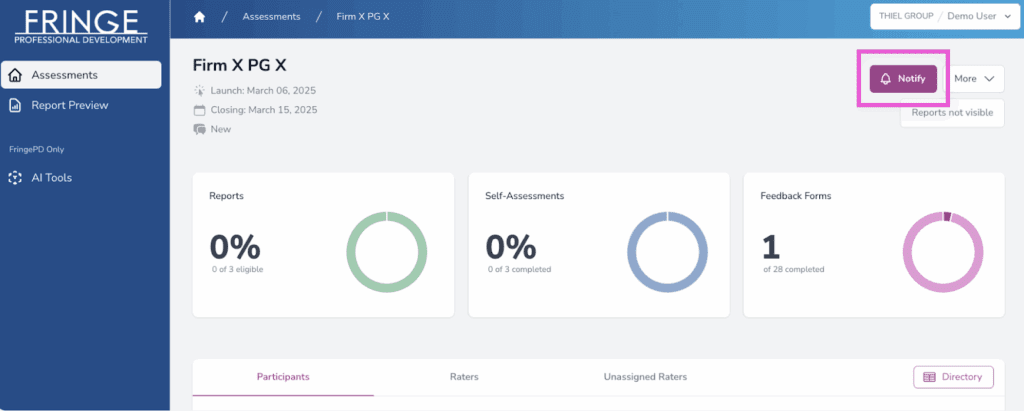
10. Schedule your Assessment Launch email
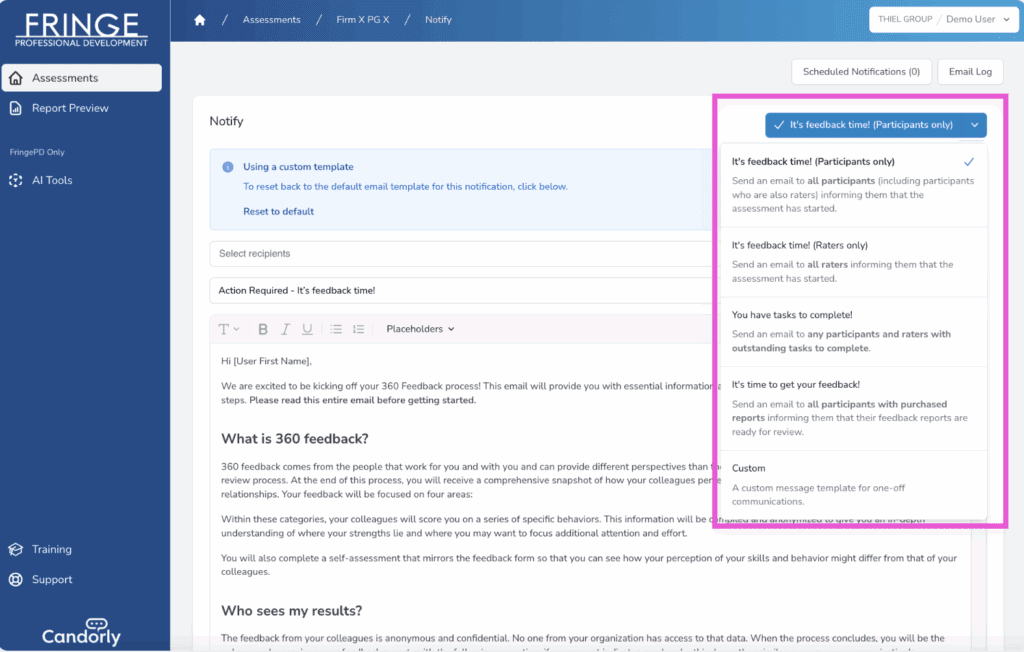
On the Assessment Dashboard, click Notify Hub. Click the blue dropdown on the top right of the notify page to switch between different built-in templates. Start with “It’s feedback time! (Participants only) email template. You’ll find a pre-drafted email to notify the Feedback Recipient that they can start their self-assessment. Feel free to edit, preview, and schedule this email on your Assessment Launch date. Then open the “It’s feedback time! (Raters only) email template and edit, preview, and schedule this email on the Assessment Launch date.
11. Check Progress and Send Reminders
Visit your Assessment Dashboard anytime to track completion rates. To boost participation, send reminders throughout the assessment period. We recommend sending at least 2–3 reminder notifications for a two-week assessment.
Use the ‘You Have Tasks to Complete’ email template for these reminders. Candorly’s Notify Hub ensures emails are only sent to those who have not completed their feedback forms when the email is scheduled, preventing unnecessary messages.
Check the dashboard every other day to monitor participation. If participation is low, increase outreach to encourage responses. If your client hasn’t received enough participation to be eligible for the Feedback Report, extend the assessment timeline under Edit Assessment.
Closing the Assessment (and Sending the Report)
12. Prepare the report
Once the assessment closes, it’s time to prepare the report. In the Assessment Dashboard, click the More dropdown in the top right and select Review Report Summaries.

Here, you’ll find the Feedback Recipient’s average score by category and an AI-generated summary. To view individual comments, click Show Comments. You can edit the AI summary to reflect your interpretation of the feedback better if needed.
To make summaries visible in the final report, toggle Summaries Not Visible—it will turn purple and read Summaries Visible.
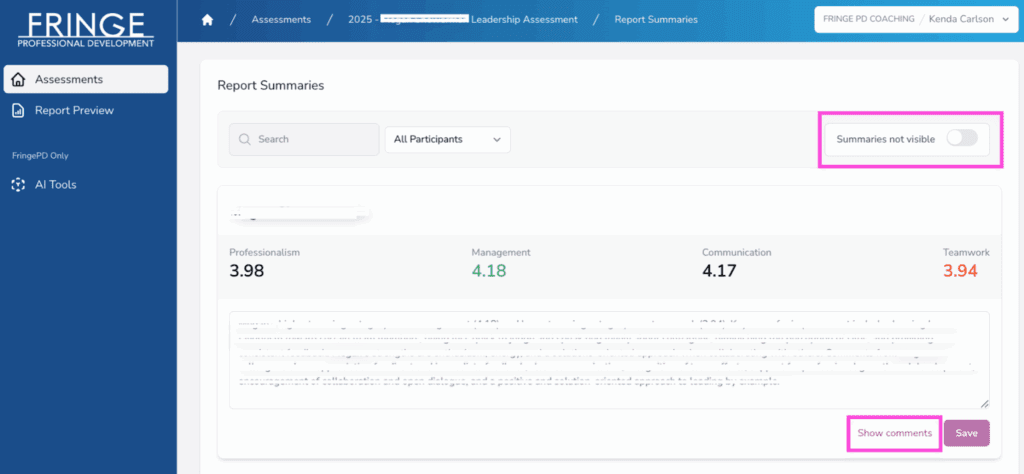
In rare cases where a comment is inappropriate, you can withhold it from the report by selecting Review Comments, hovering over the comment, and clicking the eye icon with a line through it.

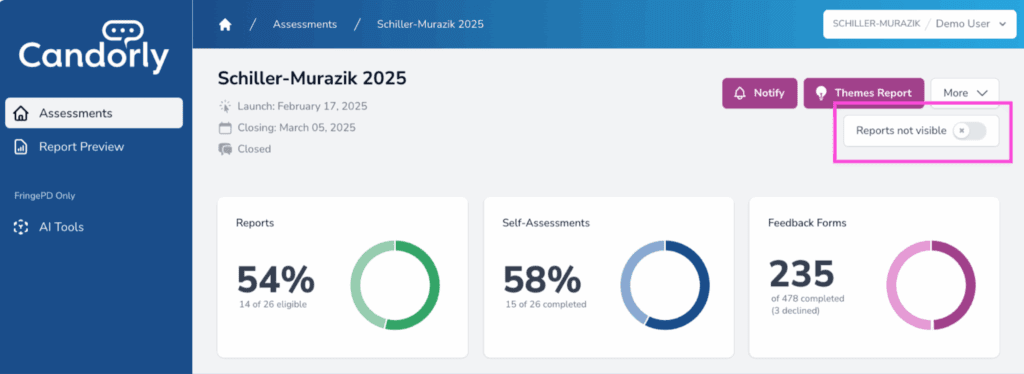
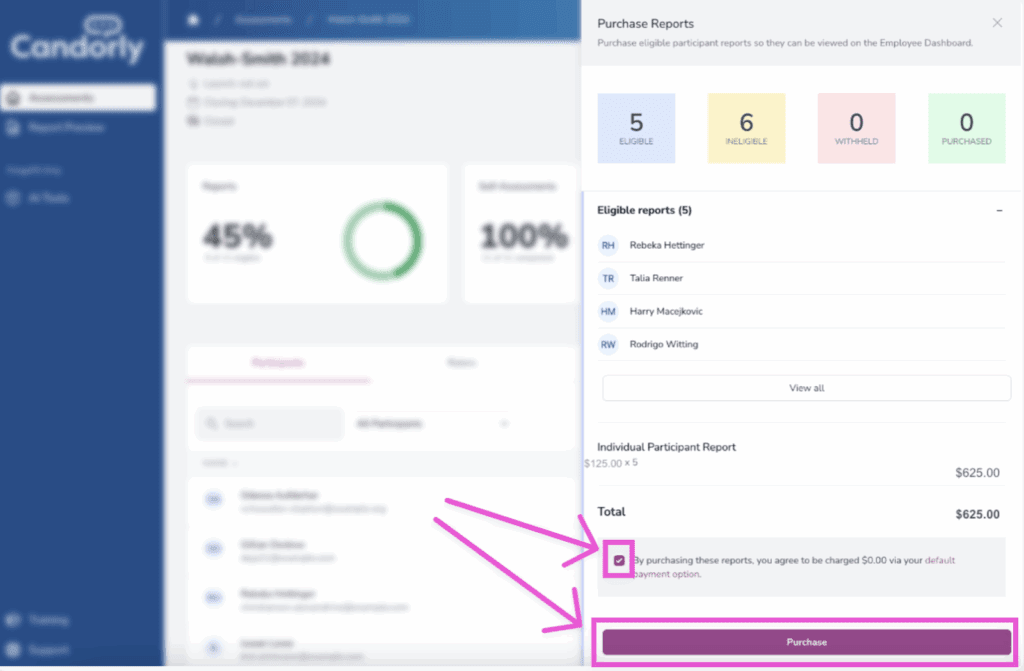
13. Purchase the Report
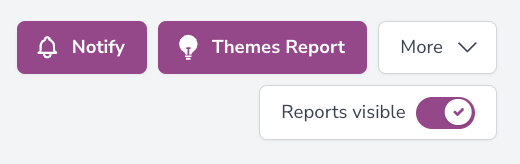
To purchase the report, go to the Assessment Dashboard and click the Reports Not Visible toggle.
Once clicked, it will bring you to the Purchase Reports page. Then you have to check the small confirmation box and hit the large purple Purchase button.
The next page will allow you to make your purchased reports visible on the User Dashboard, so click the Reports Not Visible toggle, and it will turn purple and say Reports Visible.
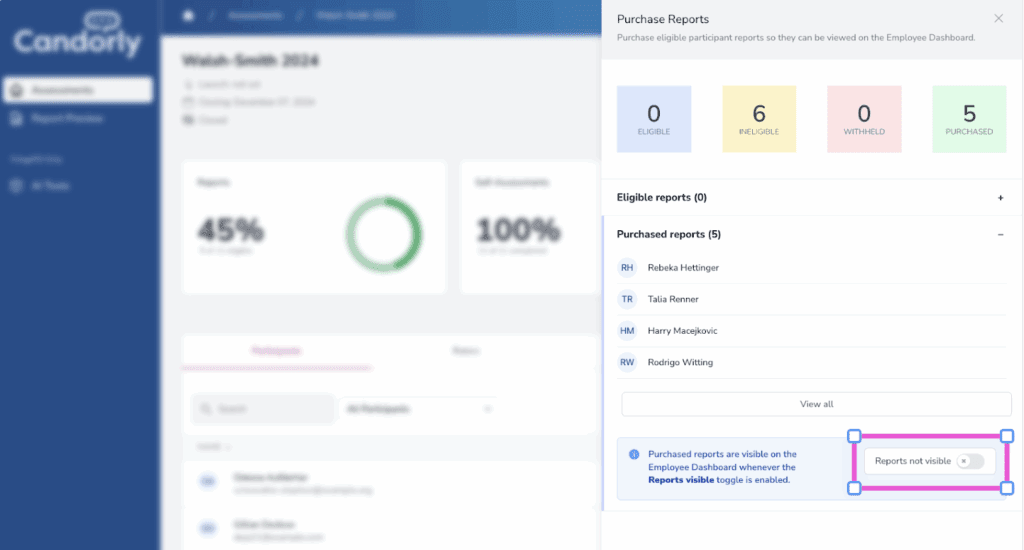
Once purchased, the Not Visible toggle on the Assessment Dashboard will also turn purple and say Report Visible.
14. Share the report
In the Assessment Dashboard, click Notify Hub. Then, click the blue dropdown and select the It’s Time to Get Your Feedback! template. As with the other notifications, please edit this email before sending it.
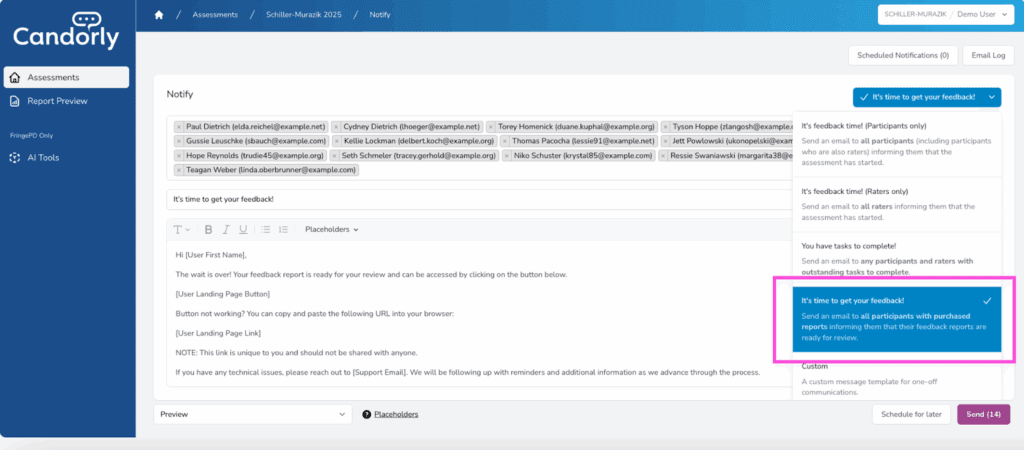
We strongly recommend scheduling a coaching session 48 hours after the recipient receives the report. This gives them time to review while keeping the feedback fresh in their mind
Congratulations! You just completed a Feedback assessment in Candorly.